Run ToolJet with Docker
Run Pomerium with Docker Compose to secure your ToolJet application.
What is ToolJet?
ToolJet is a self-hosted, low-code platform that helps you build and deploy internal developer tools.
Why use Pomerium with ToolJet?
Pomerium can secure ToolJet by applying policy to your routes that only grants access to ToolJet to certain users.
ToolJet provides its own RBAC-based permissions and several user authentication flows, so proxied requests will require users to sign in twice.
Before you begin
To complete this guide, you need:
Set up Pomerium
- Core
- Enterprise
Create a config.yaml file and add the following code:
authenticate_service_url: https://authenticate.localhost.pomerium.io


idp_provider: github
idp_client_id: REPLACE_ME
idp_client_secret: REPLACE_ME

# Update the signing key: https://www.pomerium.com/docs/reference/signing-key
signing_key: LS0tLS1CRUdJTiBFQyBQUklWQVRFIEtFWS0tLS0tCk1IY0NBUUVFSURRemVZWDZyT2tuemFnTjRJVTYxaEtRc3pzY1EvRllmbzZPcXhWd2YvdGZvQW9HQ0NxR1NNNDkKQXdFSG9VUURRZ0FFc1V0V2psYXZ3eHprSU9DVUNDeFVnTDJza2NjL3QxSTFmQXlxUDgrMWw5YU1CWDlzdm1pYgpRajJxcWFUbUJZZWhuQzhmak5LODZmVXhpc3d1SXN5bnp3PT0KLS0tLS1FTkQgRUMgUFJJVkFURSBLRVktLS0tLQo=

routes:
  - from: https://verify.localhost.pomerium.io
    to: http://verify:8000
    policy:
      - allow:
          or:
            - email:
                is: user@example.com
    pass_identity_headers: true
  - from: https://tooljet.localhost.pomerium.io
    to: http://tooljet:80
    host_rewrite_header: true
    policy:
      - allow:
          or:
            - email:
                is: user@example.com
Next, you need to:
- Update the IdP configuration variables with your own (See the GitHub guide for more information)
- Replace user@example.com with the email associated with your IdP
- Generate a signing key
To generate a signing key, use the commands below:
# Generates a P-256 (ES256) signing key
openssl ecparam  -genkey  -name prime256v1  -noout  -out ec_private.pem
# Prints the base64 encoded value of the signing key
cat ec_private.pem | base64
Add the base64-encoded signing key to the signing_key variable in your config.yaml file.
Add Pomerium services to Docker Compose
Update docker-compose.yaml with the following configuration:
networks:
  main: {}
services:
  pomerium:
    image: pomerium/pomerium:latest
    volumes:
      ## Mount your config file: https://www.pomerium.com/docs/reference/
      - ./config.yaml:/pomerium/config.yaml:ro
    ports:
      - 443:443
    ## A network alias is only required when using `localhost.pomerium.io`
    networks:
      main:
        aliases:
        - authenticate.localhost.pomerium.io
  ## https://verify.localhost.pomerium.io --> Pomerium --> http://verify
  verify:
    networks:
      main: {}
    image: pomerium/verify:latest
    expose:
      - 8000
  tooljet:
    networks:
      main: {}
    tty: true
    stdin_open: true
    image: tooljet/tooljet-ce:latest
    restart: always
    env_file: .env
    ports:
      - 80:80
    depends_on:
      - postgres
    environment:
      SERVE_CLIENT: "true"
      PORT: "80"
    command: npm run start:prod

  postgres:
    networks:
      main: {}
    image: postgres:13
    restart: always
    ports:
      - 5432:5432
    volumes:
      - postgres:/var/lib/postgresql/data
    environment:
      - POSTGRES_PASSWORD=postgres
volumes:
  postgres:
    driver: local
    driver_opts:
      o: bind
      type: none
      device: ${PWD}/postgres_data
  certs:
  logs:
  fallbackcerts:
This configuration also includes the Docker image to run ToolJet.
Set up ToolJet
In the root folder of your project, create a folder called postgres_data to run ToolJet's in-built PostgreSQL database:
mkdir postgres_data
Add a .env file pre-populated with ToolJet's environment variables:
curl -LO https://raw.githubusercontent.com/ToolJet/ToolJet/main/deploy/docker/.env.example
mv .env.example .env
In your .env file, make the following changes:
- Update
LOCKBOX_MASTER_KEYandSECRET_KEY_BASEfollowing ToolJet's environment variable docs - Replace
TOOLJET_HOSTNAMEwith your Pomerium external route URL instead
For example:
TOOLJET_HOSTNAME=https://tooljet.localhost.pomerium.io
Keep the default values for the database configuration and the other environment variables.
Run ToolJet
Run docker compose up to run your Pomerium and ToolJet containers.
In your terminal, wait until ToolJet is in a ready state:

In your browser, go to the external ToolJet URL to set up your workspace.
Pomerium Enterprise
This guide assumes you can access the Enterprise Console.
The Docker Compose configuration in the Enterprise portion of this guide uses same implementation as the Enterprise Quickstart.
The Enterprise Console configuration in this guide consists of three files:
config.yamlconsole-config.yamldocker-compose.yaml
In your config.yaml file, add the following code:
idp_provider: REPLACE_ME
idp_provider_url: REPLACE_ME
idp_client_id: REPLACE_ME
idp_client_secret: REPLACE_ME

signing_key: REPLACE_ME

routes:
  - from: https://verify.localhost.pomerium.io
    to: http://verify:8000
    pass_identity_headers: true
    policy:
      - allows:
           or:
            - email:
                 is: user@example.com
  - from: https://console.localhost.pomerium.io
    to: http://pomerium_console:8701
    pass_identity_headers: true
    policy:
      - allows:
           or:
            - email:
                 is: user@example.com
Next, you need to:
- Update the IdP configuration variables with your own (See the GitHub guide for more information)
- Replace user@example.com with the email associated with your IdP
- Generate a signing key
To generate a signing key, use the commands below:
# Generates a P-256 (ES256) signing key
openssl ecparam  -genkey  -name prime256v1  -noout  -out ec_private.pem
# Prints the base64 encoded value of the signing key
cat ec_private.pem | base64
Add the base64-encoded signing key to the signing_key variable in your config.yaml file.
Add Console services to Docker Compose
Update your docker-compose.yaml file with the following configuration:
networks:
  main: {}
services:
  pomerium:
    image: pomerium/pomerium:latest
    volumes:
      - ./config.yaml:/pomerium/config.yaml:ro
    ports:
      - 443:443
    networks:
      main:
        aliases:
          - authenticate.localhost.pomerium.io
    environment:
      - AUTHENTICATE_SERVICE_URL=https://authenticate.localhost.pomerium.io
      - COOKIE_SECRET=j9jZgysWVxCs3uqbmw9a2LxWwz1ZPLKQZ8v20eoDT8Y=
      - SHARED_SECRET=mxGl062SqkrbQKvqG9R2jqHqxq1Oi1BNj2AAeZHNq7c=
      - DATABROKER_STORAGE_TYPE=postgres
      - DATABROKER_STORAGE_CONNECTION_STRING=postgresql://postgres:postgres@database/postgres?sslmode=disable
  pomerium_console:
    networks:
      main:
    depends_on:
      database:
        condition: service_healthy
      pomerium:
        condition: service_started
    image: docker.cloudsmith.io/pomerium/enterprise/pomerium-console:v0.21.0
    command:
      - 'serve'
      - '--config'
      - '/pomerium/console-config.yaml'
    expose:
      - 8701
      - 9090
    environment:
      - AUDIENCE=console.localhost.pomerium.io
      - DATABASE_ENCRYPTION_KEY=tXBj4gGDj45m8cW7ehhcy5lRuxsEeNl0X/nnsN5YJPw=
      - DATABROKER_SERVICE_URL=http://pomerium:5443
      - SHARED_SECRET=mxGl062SqkrbQKvqG9R2jqHqxq1Oi1BNj2AAeZHNq7c=
      - DATABASE_URL=postgresql://postgres:postgres@database/postgres?sslmode=disable
      - PROMETHEUS_LISTEN_ADDR=:9090
      - PROMETHEUS_DATA_DIR=/data
      - SIGNING_KEY=REPLACE_ME
    volumes:
      - metrics:/data:rw
      - ./console-config.yaml:/pomerium/console-config.yaml:ro
  database:
    networks:
      main: {}
    image: postgres:latest
    restart: always
    healthcheck:
      test: ['CMD-SHELL', 'pg_isready -d postgres -U postgres']
      interval: 5s
      timeout: 5s
      retries: 5
      start_period: 30s
    environment:
      - POSTGRES_USER=postgres
      - POSTGRES_PASSWORD=postgres
      - POSTGRES_DB=postgres
    expose:
      - 5432
    volumes:
      - pgdata:/var/lib/postgresql/data
  verify:
    networks:
      main: {}
    image: pomerium/verify:latest
    expose:
      - 8000
    restart: always
  tooljet:
    networks:
      main: {}
    tty: true
    stdin_open: true
    image: tooljet/tooljet-ce:latest
    restart: always
    env_file: .env
    ports:
      - 80:80
      - 8082:8082
    depends_on:
      - postgres
    environment:
      SERVE_CLIENT: "true"
      PORT: "80"
    command: npm run start:prod

  postgres:
    networks:
      main: {}
    image: postgres:13
    restart: always
    ports:
      - 5433:5432
    volumes:
      - postgres:/var/lib/postgresql/data
    environment:
      - POSTGRES_PASSWORD=postgres
volumes:
  pgdata:
  metrics:
  postgres:
    driver: local
    driver_opts:
      o: bind
      type: none
      device: ${PWD}/postgres_data
  certs:
  logs:
  fallbackcerts:
Add the signing key you generated in config.yaml to the SIGNING_KEY environment variable.
Add the following configuration settings to console-config.yaml and replace the values with your own:
administrators: admin@example.com
license_key: YOUR_LICENSE_KEY
Set up ToolJet
In the root of your project, create a folder called postgres_data to run ToolJet's in-built PostgreSQL database:
mkdir postgres_data
Add a .env file pre-populated with ToolJet's environment variables:
curl -LO https://raw.githubusercontent.com/ToolJet/ToolJet/main/deploy/docker/.env.example
mv .env.example .env
In your .env file, make the following changes:
- Update
LOCKBOX_MASTER_KEYandSECRET_KEY_BASEfollowing ToolJet's environment variable docs. - Replace
TOOLJET_HOSTNAMEwith your Pomerium external route URL instead.
For example:
TOOLJET_HOSTNAME=https://tooljet.localhost.pomerium.io
Keep the default values for the database configuration and the other environment variables.
Build a route and policy
Run docker compose up and go to your Console dashboard.
In your Enterprise Console, create a policy:
- Name your policy (for example, tooljet), then select the Builder tab
- Select ADD ALLOW BLOCK, then select the + icon to add an OR operator
- In the Criteria field, select Email
- In the Value field, enter the email address associated with your IdP
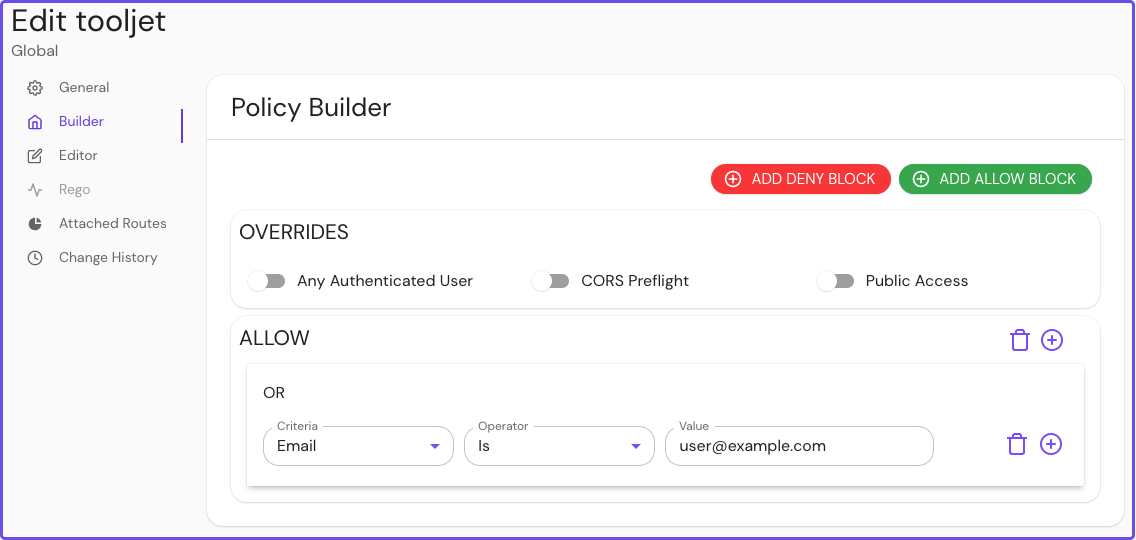
Save your policy.
Create an external route to access ToolJet:
- Name your route and enter the external route in the from: field
- Enter the scheme and hostname in the to: field
- In the Policies field, select the policy you built for ToolJet
- Select Pass Identity Headers
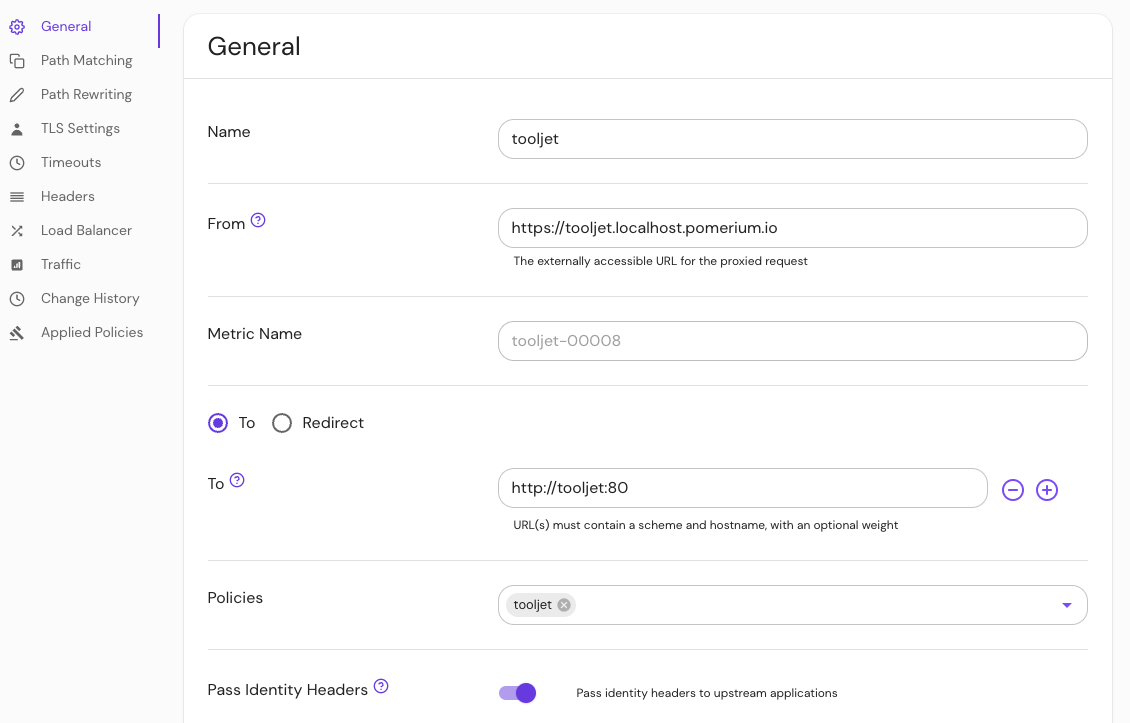
Configure your route to rewrite the host header:
- Select Headers from the sidebar
- In the Host Headers dropdown, select Rewrite to Header
- In the Host Rewrite to Header field, enter the external route without the protocol
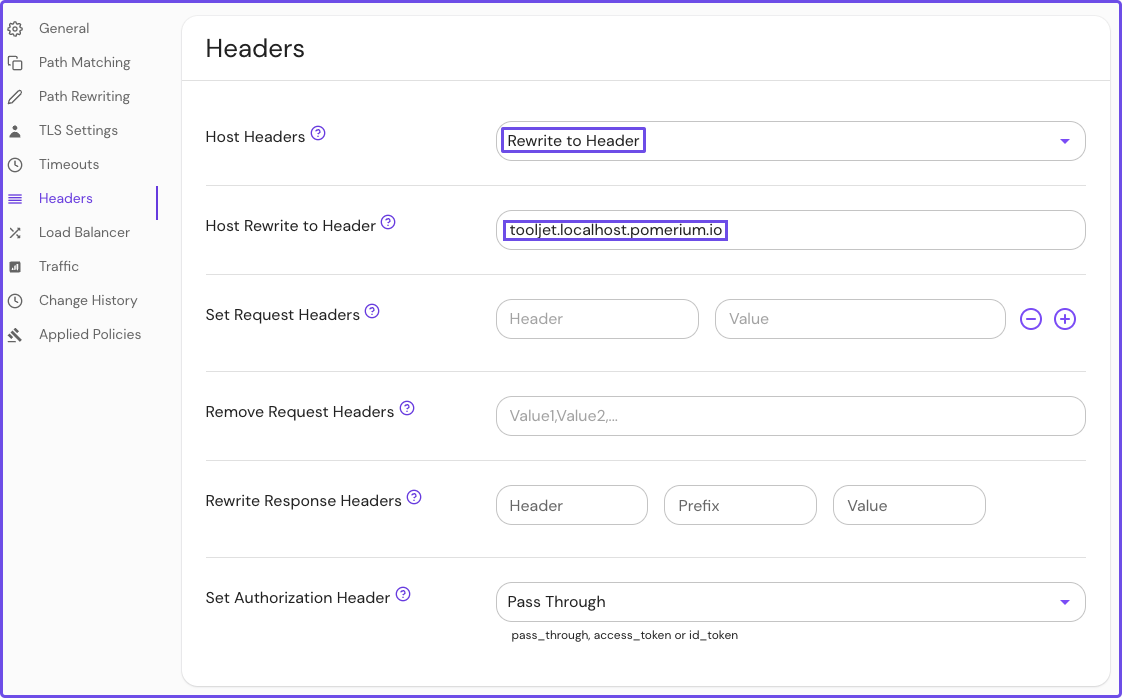
Save your route.
Access ToolJet from Console
In your terminal, wait until ToolJet is in a ready state:
In your browser, go to the external ToolJet URL to set up your workspace.
Set up ToolJet workspace
Set up your admin account:
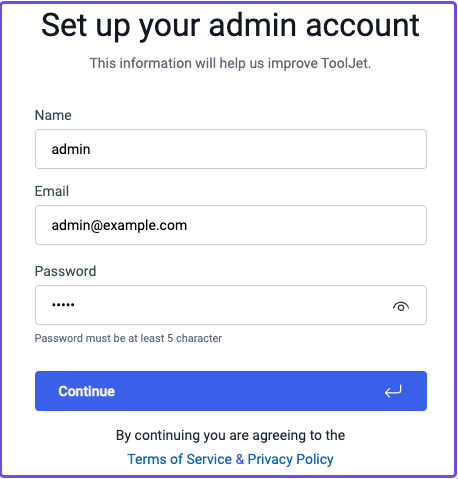
Set up your workspace:
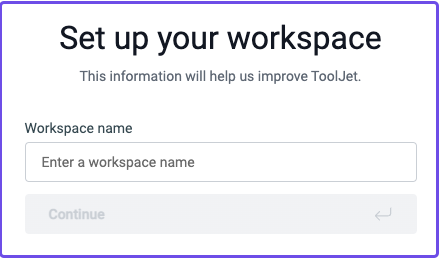
Skip the prompts asking for your company information.
You should now be in your ToolJet dashboard.
Invite a user
To invite a user:
- Select Workspace settings (the Gear icon)
- In the Users & Permissions window, select Invite new user
- Enter their details and select Create User
- Copy their invite link
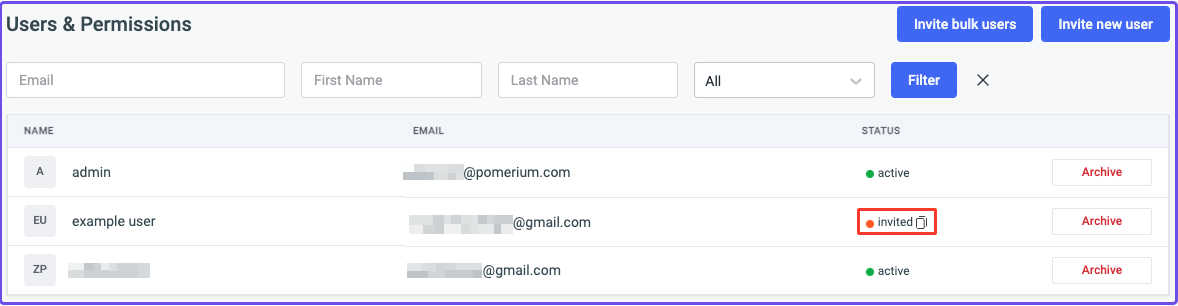
Open the link in a new tab:
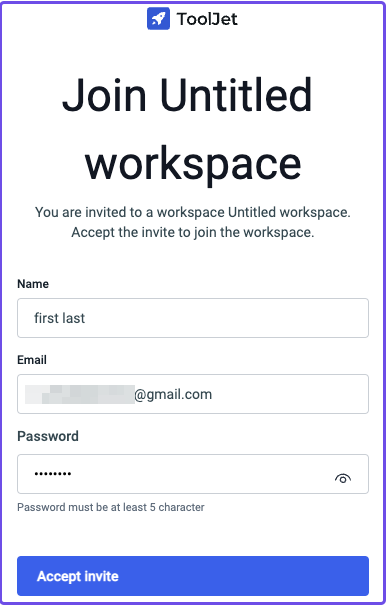
Create a password and accept the invite to log in to the workspace.
From here, you can sign in as an admin and create apps within a workspace, create new workspaces, build apps within a given workspace, and configure workplace permissions to manage access and privileges for users and groups within ToolJet.