TiddlyWiki
Learn how to add authentication and authorization to an instance of TiddlyWiki on NodeJS with Pomerium.
What is TiddlyWiki on Node.js
TiddlyWiki is a personal wiki and a non-linear web notebook for organizing and sharing information.
It is available in two forms:
- As a single HTML page
- As a Node.js application
In this guide, you will run Pomerium and your TiddlyWiki Node.js application in Docker containers.
How you will secure TiddlyWiki
Securing access to TiddlyWiki involves two steps:
- Configuring Pomerium to forward specific user session data in an unsigned header to TiddlyWiki
- Configuring TiddlyWiki to accept a special request header for trusted authentication
In this way, you can implement single sign-on (SSO) for your TiddlyWiki instance, which means an authorized user only needs to authenticate once to access the application.
To configure TiddlyWiki, you'll set its ListenCommand to use the authenticated-user-header parameter. You'll configure Pomerium to forward the user's email claim in an unsigned header to TiddlyWiki.
Before you start
- Core
- Enterprise
If you completed our Quickstart guide, you should have a working Pomerium project with the following YAML files:
config.yamldocker-compose.yaml
If you haven't completed the Quickstart:
- Install Docker and Docker Compose
- Create a
config.yamlfile for your Pomerium configuration - Create a
docker-compose.yamlfile for your Docker configuration
Set up Pomerium
Add the following code in your config.yaml file:
authenticate_service_url: https://authenticate.pomerium.app

jwt_claims_headers:
  X-Pomerium-Claim-Email: email

routes:
  - from: https://wiki.localhost.pomerium.io
    to: http://tiddlywiki:8080
    pass_identity_headers: true
    policy:
      - allow:
          and:
            - email:
                # Replace with your email address
                is: user@example.com
Let's review the configuration file:
- The
jwt_claims_headerssetting will forward the user's email address in an unsigned, HTTP request header. The header follows the custom format specified in the file (in this case,X-Pomerium-Claim-Email). - The
pass_identity_headerssetting tells Pomerium to forward all identity headers to the upstream application - The attached policy authorizes users with a matching email address to access TiddlyWiki. Pomerium will forward the address specified in the policy to TiddlyWiki as an unsigned identity header.
Set up Docker Compose services
Add the following code in your docker-compose.yaml file:
services:
  pomerium:
    image: pomerium/pomerium:latest
    volumes:
      - ./config.yaml:/pomerium/config.yaml:ro
    ports:
      - 443:443

  tiddlywiki_init:
    image: elasticdog/tiddlywiki:latest
    volumes:
      - ./wiki:/tiddlywiki
    command: ['mywiki', '--init', 'server']

  tiddlywiki:
    image: elasticdog/tiddlywiki:latest
    ports:
      - 8080:8080
    volumes:
      - ./wiki:/tiddlywiki
    command:
      - mywiki
      - --listen
      - host=0.0.0.0
      - authenticated-user-header=X-Pomerium-Claim-Email
    depends_on:
      - tiddlywiki_init
Before you test your services, make sure the value of authenticated-user-header matches the value of the custom header defined in config.yaml.
Run Docker Compose:
docker compose up
The Enterprise path to this guide requires a Pomerium Enterprise account and administrator access to an Enterprise Console instance.
It also assumes you are using Docker and Docker Compose to run your services.
Set up TiddlyWiki
Pomerium Enterprise
The Docker Compose example below contains the minimal configuration required to run TiddlyWiki. It does not include the configuration for Pomerium Enterprise.
For an example Pomerium Enterprise configuration using Docker Compose, see the Enterprise Quickstart guide.
In your docker-compose.yaml file, add the TiddlyWiki configuration:
services:
  tiddlywiki_init:
    image: elasticdog/tiddlywiki:latest
    volumes:
      - ./wiki:/tiddlywiki
    command: ['mywiki', '--init', 'server']

  tiddlywiki:
    image: elasticdog/tiddlywiki:latest
    ports:
      - 8080:8080
    volumes:
      - ./wiki:/tiddlywiki
    command:
      - mywiki
      - --listen
      - host=0.0.0.0
      - authenticated-user-header=X-Pomerium-Claim-Email
    depends_on:
      - tiddlywiki_init
Create a policy
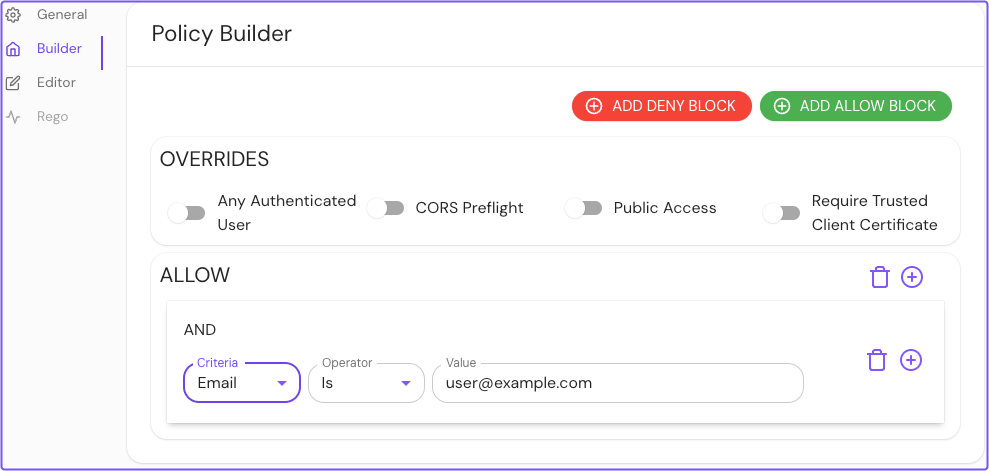
- In the Builder tab, select ADD ALLOW BLOCK
- Select the AND operator
- Select Email as the criteria and Is as the operator
- Enter the email address you will authenticate with as the value
Save your policy.
Create a route
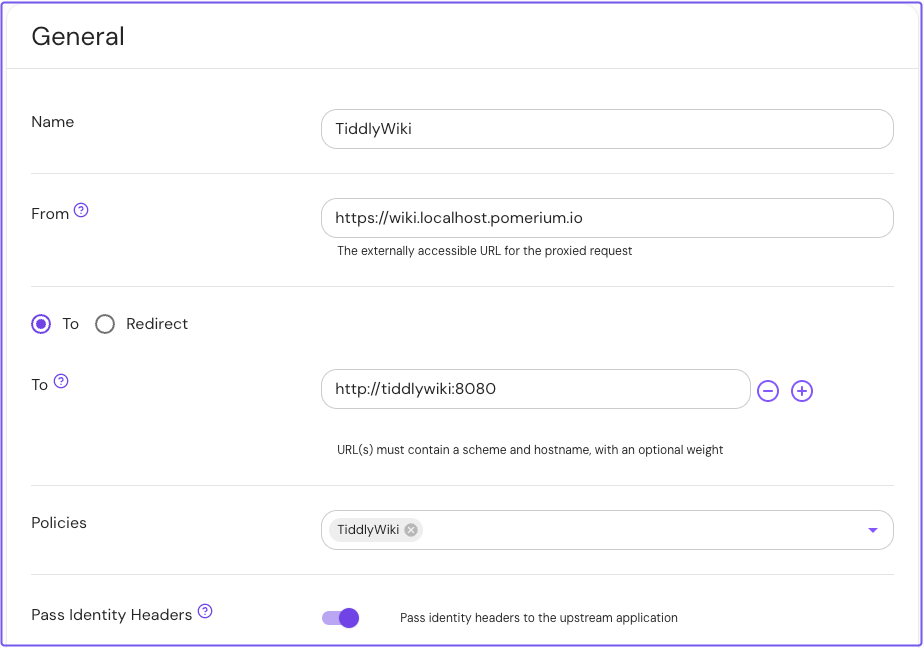
- Add a new route and enter a Name
- In From, enter the externally accessible URL
- In To, enter the internally accessible URL
- Add the policy for this route (for example,
TiddlyWiki) - Enable Pass Identity Headers
Save your route.
Set identity headers
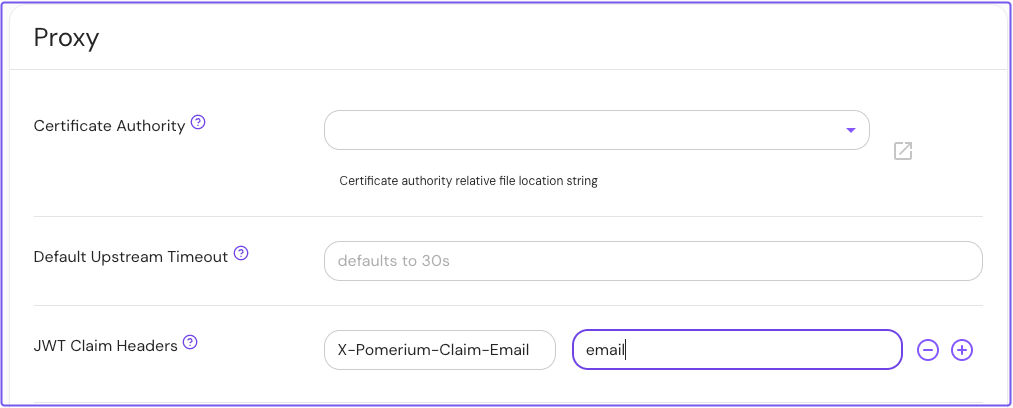
- In the sidebar under CONFIGURE, select Settings
- Select the Proxy tab
- In JWT Claim Headers, enter the header and expected claim
Save your settings.
Test TiddlyWiki
In your browser, navigate to your TiddlyWiki instance. Pomerium will prompt you to authenticate against its hosted identity provider.
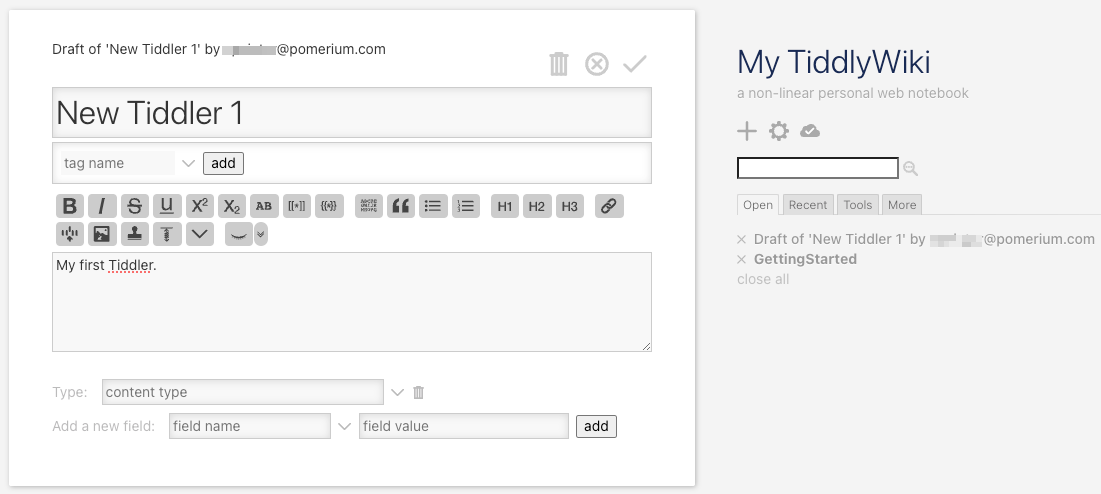
After successful authentication, Pomerium will redirect you to your TiddlyWiki instance:
Great job! You successfully secured TiddlyWiki behind Pomerium.